
Getting Started with RViz in ROS 2 Humble

Introduction to RViz
For those beginning their robotics journey using ROS 2 Humble, RViz will soon become one of your most frequently used tools. This guide will help you understand:
What RViz is and its role in ROS development
Why it's a critical component for robot visualization
How to leverage it to monitor sensor data and robot movements in real-time
What Is RViz?
RViz (ROS Visualization) is a powerful 3D visualization tool that lets you peer into your robot’s "mind." Whether you’re working with:
Sensor data (LiDAR, IMU, etc.),
Camera feeds,
Robot motion planning,
RViz brings your robot’s world to life, making debugging, development, and learning far more intuitive.
RViz Setup Process for ROS2 Humble
Prerequisites
Before starting this tutorial, ensure you have:
A working installation of ROS 2 Humble (Desktop version) Beginners guide to ROS2 Humble Installation
Ubuntu 22.04 LTS (recommended for ROS 2 Humble)
Basic knowledge of how to use the Linux terminal
Your ROS 2 workspace created and sourced (e.g.,
source install/setup.bash) Creating Workspace and package
NOTE: RViz2 (ROS Visualization Tool) is typically installed automatically when you install the ROS2 Humble desktop version. Here's how to verify and set it up:
Checking RViz2 Installation
To verify if RViz2 is already installed on your system, run the following command in your terminal:
ros2 pkg list | grep rviz2If the output shows rviz2, then RViz is properly installed on your system.
Installing RViz2
If RViz2 isn't installed, you can install it using one of these methods:
Install only RViz2
sudo apt install ros-humble-rviz2Install full ROS2 Desktop (includes RViz2)
sudo apt install ros-humble-desktopLaunching RViz2
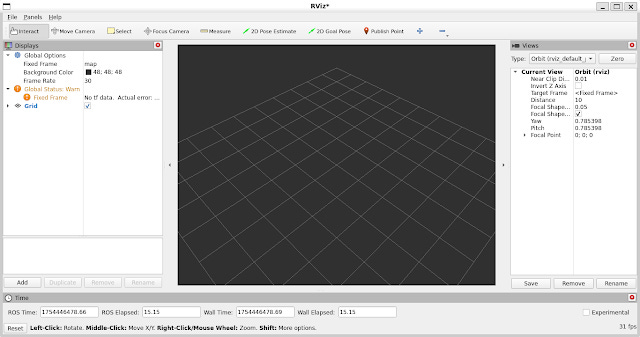
Once installed, you can launch RViz2 by running:
rviz2
You will see the following window:
Possible Errors and Solutions During Installation and Launching
Error: Command ‘rviz2’ Not Found
Cause: This typically occurs because the ROS 2 environment hasn’t been sourced in your terminal.
Solution:
Temporary Fix: Source the ROS 2 environment manually in your current terminal:
source /opt/ros/humble/setup.bash(Note: You’ll need to repeat this every time you open a new terminal.)
Permanent Fix: Add the sourcing command to your
.bashrcfile to automate this process:
echo "source /opt/ros/humble/setup.bash" >> ~/.bashrcAfter running this, either restart your terminal or run
source ~/.bashrcto apply changes immediately.
Understanding the RViz Interface
When you first launch RViz, you’ll see this layout:
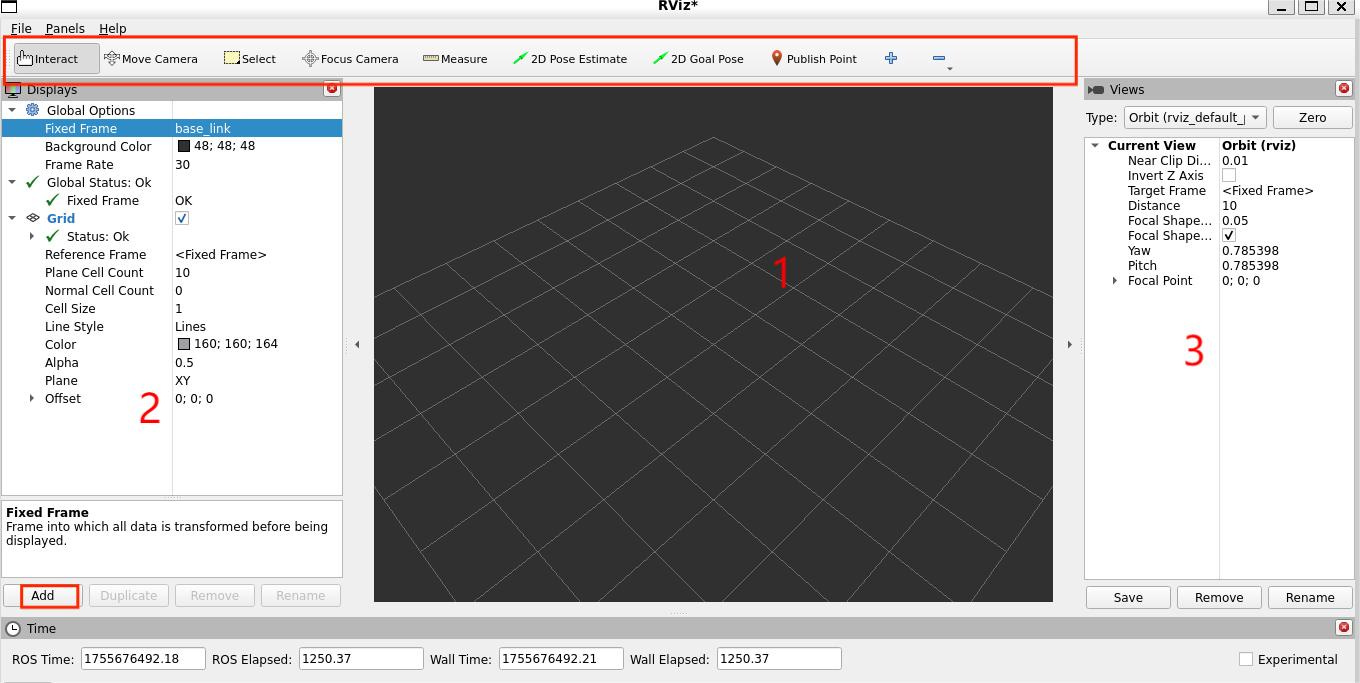
3D View (Center)
The large black window is your 3D visualization area.
Currently empty since no displays are active.
Displays Panel (Left Sidebar)
Lists all loaded displays (e.g., sensors, robot models).
Default contents:
Global Options (configuration settings)
Grid (reference plane; we’ll cover this later).
Tools & Properties (Right Sidebar)
Additional panels for:
View controls
Tool properties
Visualization settings.
Adding a New Display
Click the Add button at the bottom of the Displays panel.

This will pop up the new display dialog:
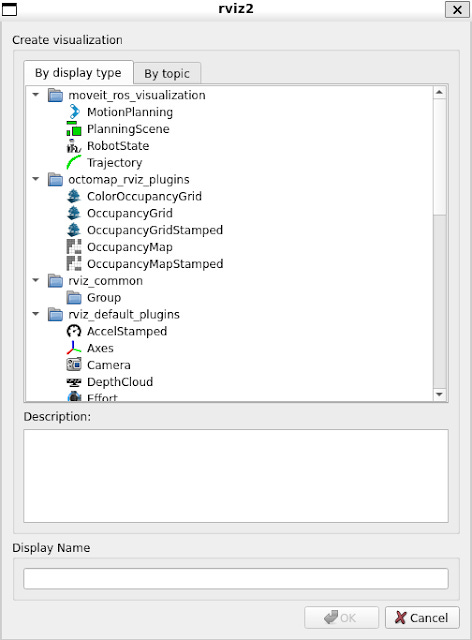
The list at the top contains the display type
The type details what kind of data this display will visualize
The text box in the middle gives a description of the selected display type
Finally, you must give the display a unique name
If you have, for example, two laser scanners on your robot, you might create two Laser Scan displays named "Laser Base" and "Laser Head"
Example: Using RViz’s "Add" Feature to Visualize a Robot
One of RViz’s most powerful features is the ability to dynamically add visualizations. Let’s walk through a practical example—loading your URDF-based robot model:
Open the Displays Panel
All visualization management happens in the left-side Displays panel.
Click "Add"
Find this button at the panel’s bottom—it’s your gateway to every visualization type.
Select "RobotModel"
From the list, choose this option to load your robot’s URDF representation.
Verify the Configuration
RViz auto-populates:
Joint hierarchies
Link geometries
TF frames
Critical Check: Ensure the Fixed Frame (under Global Options) matches your robot’s base frame (e.g.,
base_link).
Finalize with "OK"
Your robot should now appear in the 3D view, ready for inspection!
This simple "Add" workflow unlocks:
Instant Validation
Confirm your URDF’s accuracy before hardware testing.
TF Debugging
Visually verify frame relationships and detect misalignments.
Sensor Integration
Later, add displays like LaserScan or PointCloud2 to see sensor data in context.
Troubleshooting Tip: If the robot is invisible, check:
URDF file permissions/paths
robot_state_publisheris active (ros2 topic echo /robot_description)TF tree integrity (
ros2 run tf2_tools view_frames.py)
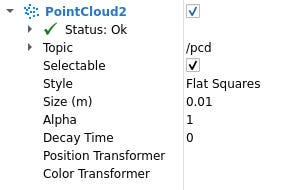
Configuring Display Properties
Every display in RViz includes customizable properties that control its visualization. These appear as adjustable parameters when a display is selected.
Examples of display properties include:
Color schemes for point clouds or markers
Topic selection for sensor data streams
Alpha values (transparency) for rendered objects
Frame settings for coordinate system alignment
Display Status in RViz
Each display in RViz includes a status indicator to show its operational state. The possible status values are:
OK (Functioning normally)
Warning (Potential issues detected)
Error (Serious problem preventing display)
Disabled (Display currently turned off)
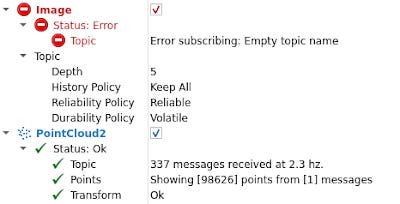
You can identify the status through:
The background color in the display's title bar
The explicit status message visible when expanding the display (under the Status category)
Views Panel in RViz
RViz offers multiple camera view types to visualize your robot's environment:
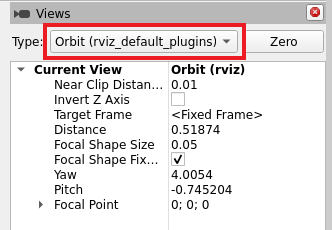
Projection Types
Perspective: Standard 3D view with depth perception (objects appear smaller with distance)
Orthographic: 2D projection without perspective distortion (useful for top-down views)
Control Methods
Orbit: Rotate around a fixed point
FPS: First-person shooter-style movement
Top-down: Fixed overhead perspective
RViz Visualization Tools Overview
RViz provides an interactive toolbar containing several specialized tools for working with your 3D visualization environment. These tools enable you to:
Navigate and inspect your robot's data from different perspectives
Interact with and measure elements in the 3D space
Configure and analyze various aspects of your visualization
The main toolbar tools include:
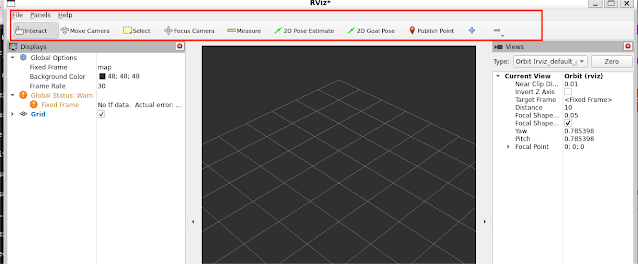
Camera Controls:
Focus Camera tool
Move Camera tool
Orbit View tool
Measurement Tools:
Measure tool (for distance calculations)
Publish Point tool
Interaction Tools:
Select Tool
2D Goal Press tool
2D Pose Estimate tool
For comprehensive details about each tool's functionality, refer to RViz's built-in documentation by selecting:
Help → Show Help Panel
Ready to Master RViz?
You’ve now taken your first steps with RViz’s core features—but there’s so much more to explore! To dive deeper:
🔹 Explore the Documentation
Access detailed tool explanations via Help → Show Help Panel in RViz
Refer to the https://docs.ros.org/en/humble/Tutorials/Configuring-RViz2.html
🔹 Watch Tutorials
The ROS community offers excellent video guides—search for "ROS 2 Humble RViz tutorial" on platforms like YouTube
🔹 Experiment Hands-On
Try visualizing different sensor data (LiDAR, cameras, IMU)
Customize displays for your robot’s specific needs
Remember: Every expert started where you are now. Keep exploring, and soon you’ll be leveraging RViz like a pro!